Developer Guide
This document contains additional information on contributing to dribdat as a developer. If you are interested in connecting to dribdat's API, scroll down to the API overview For more background references, see the README. See also the DeepWiki guide for technical specifications.
Welcome, contributor
Thanks for checking out dribdat - a tool made for brilliant, openly contributing people like you!
This code is originally based on cookiecutter-flask,
which has a number of helpful developer features.
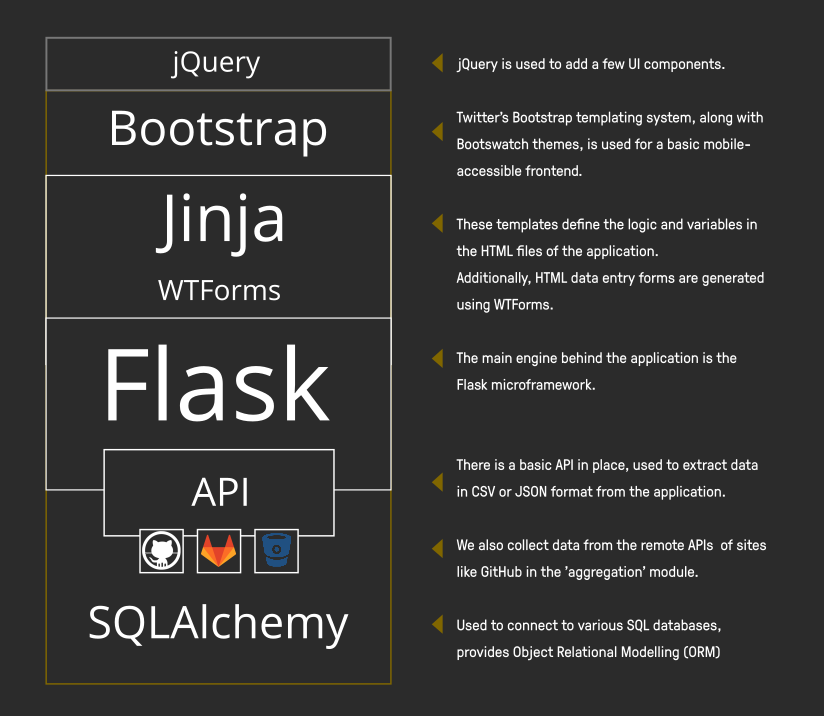
Dribdat is a Python 3 project that uses the Flask microframework and SQLAlchemy for data modelling on the backend. A plain JSON API, along with Jinja templates and WTForms, serves data to a frontend based on Bootstrap 3 and jQuery.

Getting started
It is possible to start a development build using the docker-compose.local.yml configuration for Docker Compose. Otherwise, you need to set up your coding environment as follows.
(1) Install Git, Python and Poetry to start working with the code. Virtualenv and pip are also supported as alternatives to Poetry. Then get the sources using git:
git clone https://codeberg.org/dribdat/dribdat.git
cd dribdat
(2) You may need to install additional system libraries (libffi) for the misaka package, which depends on CFFI. You are likely to also need development headers for Python.
- For example, in Fedora Linux run:
sudo dnf install libffi-devel python3-devel gcc - On Ubuntu (
apt) or Alpine Linux (apk):sudo apk add libffi-dev python3-dev gcc
(3) Next, run the following commands from the repository root folder to bootstrap your environment with Poetry:
poetry install
poetry shell
Tip: If using plain pip, run:
pip install -r requirements/dev.txt. Production pip requirements are updated using poetry-plugin-export (install separately), and the commandpoetry export --without-hashes -o requirements/prod.txt
(4) By default in a dev environment, a SQLite database will be created in the root folder (dev.db). You can also install and configure your choice of DBMS supported by SQLAlchemy. In production, the DATABASE_URL configures connectivity to an SQLAlchemy-compatible database engine. This requires a DRIBDAT_ENV=prod configuration.
Tip: Use
.flaskenvor.envto store environment variables for local development. See the Configuration section for more details.
(5) Run the following to create your local SQLite database tables and perform the initial migration. Note that we avoid using the production migrations folder locally due to Flask-Migrate#61:
mv migrations migrations_prod
python manage.py db init
python manage.py db migrate
python manage.py db upgrade
(6) Install a local copy of frontend resources for offline development using npm or yarn. These will be used when FLASK_ENV=dev, otherwise a CDN will be used in production. I.e.:
npm install
(7) Finally, run this command (or just debug.sh) to start the server:
DRIBDAT_ENV=dev python manage.py run
You should at this point see a welcome screen at http://127.0.0.1:5000 🎉
Follow the instructions to register your first user account, which will have admin access, and let you set up events.
Tip: disable the in-page debugger and profiler using
FLASK_DEBUG=False
Data schema
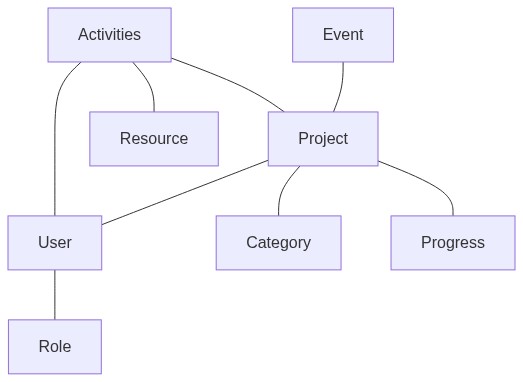
One starts an Event, to which Challenges (= Ideas) are added. These can take the form of Projects (at progress level 0), or Categories. A team is made of up of any number of Users who have certain organizer-defined Roles and have joined a Project.
The main models are represented here:
What are the differences between a Project and a Challenge?
- A Challenge is a problem statement, often with some elaboration of some ideas of how to address it - at a hackathon, this typically involves links to technical tools, datasets, or information resources. In dribdat, these are published in the form of Projects (set to an initial idea/challenge stage) and/or Categories.
- A Project contains evidence of work that has been done - typically but not always in response to a specific Challenge, as often as possible with links to documentation, source code, presentation, or any other relevant artifacts.
Coding tips
This section has some advice for developers and operators.
Shell access
To open the interactive shell, run: python manage.py shell. By default, you will have access to the User model, as well as Event, Project, Category, Activity.
Using the Heroku toolchain, heroku run python manage.py shell, or using Docker, docker-compose run --rm dribdat python manage.py shell.
Running Tests
To run all tests, whose source is in the tests folder, run: python manage.py test
To run just a specific test, specify it by name, e.g. python manage.py test --name features
Migrations
Whenever a database migration needs to be made. Run the following commands:
python manage.py db migrate
This will generate a new migration script. Then run:
python manage.py db upgrade
To apply the migration. Watch out for any errors in the process.
For a full migration command reference, run python manage.py db --help.
API Guide
There are a number of API calls that admins can use to easily get to the data in Dribdat in various formats. The full list of calls is shown in the About or Search page in a running app.
Look up data on the current event with the Hackathon Schema.org Type:
/hackathon.json
Or like this for another sprint, which is how we call our events:
/api/event/<EVENT ID>/hackathon.json
For basic information and projects in the current sprint:
/api/event/current/info.json/api/event/<EVENT ID>/info.json/api/event/current/projects.json(or.csv)/api/event/<EVENT ID>/projects.json(or.csv)/api/event/current/activity.json(or.csv)/api/event/<EVENT ID>/activity.json(or.csv)
Details on a project:
/api/project/<PROJECT ID>/info.json/api/project/<PROJECT ID>/activity.json
To get the full list of events, or all the latest activities:
/api/events.json(or.csv)/api/project/activity.json(or.csv)
To get your logged in user's full data:
/api/user/current/my-hackathons.json
To get just public data for any user:
/api/user/<USER NAME>
To search through all project contents:
/api/project/search.json?q=<text_query>
Use the limit query parameter to get more or less than 10 results.
Write access (beta)
If you would like to use external clients, like the chatbot, to remote control Dribdat you need to set DRIBDAT_APIKEY. The (experimental) call used to push data into projects is:
/api/project/push.json
Technical details
For more details see api.py
